Install ZFS on Ubuntu and create a storage pool
January 10, 2022ZFS is a combined file system and logical volume manager originally developed and implemented by a team at Sun Microsystems led by Jeff Bonwick and Matthew Ahrens. ZFS features include data corruption protection, high storage capacity (256 ZiB), snapshots and copy-on-write clones, and continuous integrity checking, to name a few. If you are working with large amounts of data or providing a backup file system for virtualization, ZFS is an excellent choice. This guide walks you through installing ZFS on Ubuntu and setting up a storage pool.
What is needed?
- Ubuntu Server
ZFS installieren
The main components of ZFS are managed as a standard Ubuntu package, so to install it we simply run this command:
sudo apt install zfsutils-linuxAfter that, we can verify that ZFS was installed correctly by running it:
whereis zfsNow we should see an output similar to this one:

Now that we have installed the necessary packages, we can create a storage pool!
Create a ZFS Storage Pool
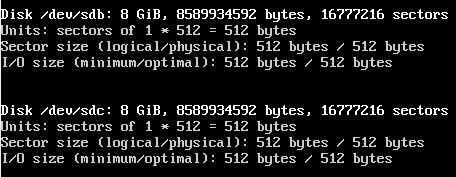
To create a ZFS storage pool we must first select the storage media we intend to use for it. With this command we can check which HDDs we have installed:
sudo fdisk -lNow let’s carefully note the device names of the drives we want to merge.
These are the two drives we will merge:
Create ZFS Pool
There are two types of simple storage pools that we can create. A striped pool, also called RAID-0, where the data is stored in “strips” on all drives, or a mirrored pool, also called RAID-1, where a full copy of all data is stored on each drive separately. Striped pools are not fault tolerant, while mirrored pools can survive the failure of a drive. Striped pools have twice the storage capacity of mirrored pools and better performance than mirrored pools.
To create a striped pool we run the following command:
sudo zpool create new-pool /dev/sdb /dev/sdcTo create a mirrored pool we run this command:
sudo zpool create new-pool mirror /dev/sdb /dev/sdcIn both examples, “new-pool” is the name of the pool.
Sometimes an error message like this may appear:

Usually, a mirrored pool is recommended because we can still access our data even if a single drive fails. However, this means that we only get the capacity of a single drive. A striped pool provides the combined space of all drives, but it is rarely recommended because if one drive fails, all data is lost. You can also choose to do both or change the designation at a later time when you add more drives to the pool.
The newly created pool is mounted at /new-pool. You can choose a different mount point with the -m option:
sudo zpool create -m /usr/share/pool new-pool mirror /dev/sdb /dev/sdcThe newly mounted pool appears to Ubuntu like any other part of the file system.
Check pool status
We check the status of the ZFS pool with the following command:
sudo zpool statusResult:
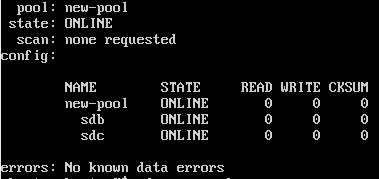
Done. ZFS is now installed on our Ubuntu server and a corresponding pool is created.